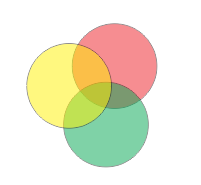
Transparency is used to make an object partially visible. In CorelDRAW, we can apply uniform, fountain (gradient), texture and pattern transparency to objects. In this tutorial, we will go through the different types of transparency and how to apply them in CorelDRAW.
How to Apply Uniform Transparency
Select the object that we will apply the transparency. Go to Object > Object Properties.
In the Transparency panel, choose Uniform transparency button
Use the Transparency slider to increase or decrease the transparency
Applying Fountain Transparency
Fountain Transparency has a gradient feel. Each color fades into another. They can be linear, elliptical, conical or rectangular. We can create fountain transparency by adding or removing nodes. We can also reverse, skew, mirror the transparency.
To apply fountain transparency, go to the Object Properties
In the Transparency area, choose Fountain Transparency
Open the Transparency Picker, click any thumbnail. Then click apply
- You can choose whether to apply the transparency to both the fill or outline of the object or just the outline or fill
You can also choose between the various transparency options such as
- Linear fountain transparency
- Elliptical fountain transparency
- Conical fountain transparency
- Rectangular fountain transparency
- Use the nodes at the sliders to change the color of the transparency at the ends of the transparency bar. Double click on the slider to add a node at the midpoint. You can drag the nodes to change the position. If you double click on the node you created at the midpoint, it will be deleted.
A dialog box appears
- You can mirror, repeat or reverse your transparency.
- You can choose the number of steps to print or display in the transparency
- The Acceleration, which is the speed at which the transparency blends from one color to another
- Smooth, which is the smooth transition between the fill nodes
- Node transparency
- Rotate, which is the angle of the transparency.
How to Apply Pattern Transparency
Pattern transparency can be a vector pattern transparency, bitmap pattern transparency or two-color pattern transparency. To add pattern transparency to an object, select the object. Go to the Object Properties, use the transparency panel to choose either vector, bitmap or two-color pattern transparency. Click the transparency slider, choose a thumbnail and click apply.
You can use Edit transparency to
- Mirror the tiles horizontally or vertically.
- The Width, Height of the transparency
- Rotate, skew and transform the transparency.
For Bitmap pattern transparency only,
- You can create a radial or linear seamless blend
- Edge Match: To smooth the color transition of the pattern tile edges
- Brightness: To change the brightness
- Luminance: To change the grayscale contrast
- Color: To change the color contrast.
- You can also apply two-color pattern transparency and texture transparency by selecting the object. Then go to Object > Object properties. Both Two color pattern transparency and texture transparency are under the same button
Select the object. Choose the transparency tool from the toolbox
Go to the property bar and click Copy transparency
Click on the object to copy the transparency
There are several merge modes options. These merge modes determine how the color of transparency work with the color of the object behind it. Some of them are:
- Normal: It applies a transparency color above the color of the object
- Multiply: It has a darkening effect. If you multiply any color with black, it results to black. If you multiply with white, it remains unchanged
- Color Burn: It imitates the photography technique of color burn
- Color Dodge: Similar to the photography style of dodging
- Screen: The resulting color will be lighter than the base color
- Soft Light: Applies soft diffused light to the object
- Hard Light: Applies hard direct light to the base color
- Overlay: The source color is multiplied according to the value of the base color
 |


0 Comments