With CorelDRAW, we can create and export files as PNG, GIF, and GIF formats. We can adjust the file size, quality and color settings. A good knowledge of different formats will serve as a guide to help you export in the right format.
JPEG is used for scanned images and photographs. It stores images as an approximation leading to loss of image quality when transferring from one system to another. PNG is used for line drawings and images. It has the unique ability to export images as a transparent format. GIF format is used for line drawing, texts, images with few colors, sharp-edged images and black and white logos. You can create animation and also transparent background using the advanced graphics option.
You might wish to know the various correct formats used to export files.
Navigating through the File Export Option
Click File > Export For > Web
Two horizontal previews: To view the versions of the bitmap with one frame above the other
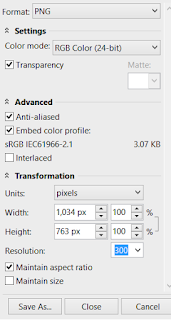
If you scroll down through the dialog box of the export options, you will see various transformation options. You can specify the width and height. The resolution can also be changed here. Tick Maintain size and Maintain aspect ratio to keep your bitmap in proportion
JPEG
When saving as JPEG, you can change the quality (there is low, medium and high-quality jpeg), and color mode (RGB, CMYK, and Grayscale). You can overprint blacks when exporting to CMYK. You can also apply matte color to the object background to help blur edges of anti-aliased objects. The transition between adjacent pixels of different colors can also be blurred. The color settings can also be changed.
Advanced Settings
The Optimise option is used to produce the smallest file size. Progressive means the image will load gradually in certain browsers till it loads completely. Anti-aliasing is used to produce a smoothly edged selection. It does this by filling the pixels along the edges creating a semi-transparent effect.
GIF and PNG
Both GIF and PNG file formats have dithering option. Dithering is used to reduce the number of the color range of images to 256 or lower number of colors. It juxtaposes two images to create the feeling that there is a third color. The interlaced option is used to make the image load gradually in certain browsers before coming to full view. Tick the Transparency option to export the image in a transparent background. The eyedropper icon is used to sample color and add to the color palette. If you double-tap any color in the palette, it will bring up a dialog box. You can adjust the color, the color mode and add the new color to the swatches.
 is used to sample color and add to the color palette. If you double-tap any color in the palette, it will bring up a dialog box. You can adjust the color, the color mode and add the new color to the swatches.


0 Comments