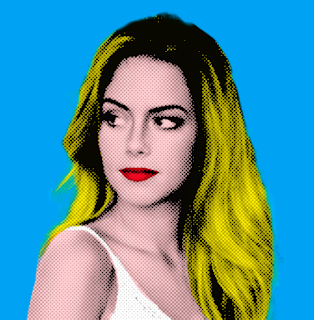
Pop art was a movement that emerged in the 1950s in the United States and Britain. It was made popular by pioneers as New York artists Andy Warhol, Roy Lichtenstein, James Rosenquist, and Claes Oldenburg. The art form used imagery from media and products. It was influenced by media, comics and make use
of bright colors.
In this tutorial we will use Photoshop to create a vintage style pop art using adjustment filters and manipulations
Step 1
In this tutorial, I will use the image of a model downloaded from kisspng. Open the image using CTRL + N
Step 2
Remove the image background. I did not go through this stage because my image came as transparent PNG hence the background is already removed. If your model is in a background, use Quick Selection Tool or Pen Tool to remove the background
Step 3
Create a new layer below the image by using CTRL + SHIFT + N. Drag it below the model by holding left mouse key and dragging down
Fill it with solid color Blue.
Alternatively you can make the foreground color blue, then press SHIFT + BACKSPACE to fill.
Step 4
Select the image layer. Go to Create New Fill or Adjustment Layer > Hue/Saturation.
Add the Clipping mask so that any adjustment affects only the image and not the background
Go to the saturation slider and move it to the extreme left. This will desaturate the image.
Step 5
While still on the Adjustment Layer, chose Threshold and add the value at 138. This value is not absolute, you can adjust the value till you are satisfied. Lower the opacity of the Threshold to 50%
Step 6
Right click on the image layer and select Convert to Smart Objects
Go to Filter > Blur > Gaussian Blur. Adjust the radius to 0.5
Go to the Filter > Filter Gallery. Then chose Halftone Pattern from the list.
Set the size at 2, contrast at 30 and Pattern Type to Dot. You can always change this value if your work appears too sharp. Change the Gaussian Blur till you get the best result
Step 7
Time to add color to the image. Create a new layer. Use the Pen Tool to select the model's lips. Select your Brush Tool and then change the foreground color to red and paint over the selected lips. I changed the layer's blending mode to Multiply
Create a new layer. Paint over the face with Brush tool. I used fccfd2 (HSB color) as my color. I also maintained layer's blending mode to Multiply
Paint over the hair with another color. I used yellow f8ec0f (HSB color). I changed the layer's blending mode to Multiply

Do the same for the eyes. Create a new layer and paint with white color. Make sure you make the blending mode Overlay this time
After detailing, this is the final art work. Hope you enjoyed and learnt how to create this pop art. Drop your comments below


0 Comments